Five different methods to fix Sound Problems:
- Restart the Windows 11 audio service
- Restart Your Computer
- Update Your PC Drivers
- Update your PC’s Windows 11
- Change audio options in the sound setting
Since the release of the Windows 11 OS update, we have been hearing a lot about all the amazing features that this OS has to offer. But, as you have been using this OS for a while now, you have noticed one thing, and that is no sound at all.
Most of the time, Windows 11 sound issues are not caused by a hardware issue with the sound card or the sound device. This may be the case for some users, but it is more common for audio-related issues to be caused by the software that is installed on your PC.
The problem of No Audio in Windows 11 or No Sound in Windows 11 was detected after the original Windows of your computer system was upgraded to the latest version of Windows 11. If you are also facing this problem, don’t worry, in this post, we will help you to solve the problem of No audio in Windows 11 using five different methods. So, let’s go through the five methods.
Why is my computer audio suddenly not working?
There are several sources of sound problems in Windows. These include your speakers, headphones, audio software, operating system, sound card, and driver. Fortunately, many Windows sound issues are caused by a configuration issue, so the solution can be as simple as turning up your volume or selecting the right audio device from your software.
How do I know if I don’t have sound in Windows?
It’s easy to find out if you don’t have any sound in Windows. However, you may also find that the sound only occasionally works, or it only works with certain devices or within a specific program.
Read Also:
6 Ways to Fix Low Storage Problem on Windows 11/10/8/7 [2024 New] TechKick
How Can I Restore My Windows 11 Sound?
If you frequently switch between speakers and headphones in Windows 11, diagnosing no sound can be tricky. Follow these steps to get a better idea of what the problem might be and how to fix it.
The first thing you need to do is check the volume level. It’s the most obvious reason why your computer doesn’t have sound, but it’s a good idea to check it before diving into the other recommendations below.
1. Restart the Windows 11 audio service
Restart the audio services. Even though this may have already been completed by the troubleshooter above, it doesn’t harm to repeat the process by hand, particularly before proceeding to the last, dangerous step below.
Locate Windows Audio Endpoint Builder in the list of services by searching Windows for them (or by running services.msc from Run). Make a right-click and select Restart.
To use this option, which involves restarting the Windows 11 audio service, follow the steps listed below.
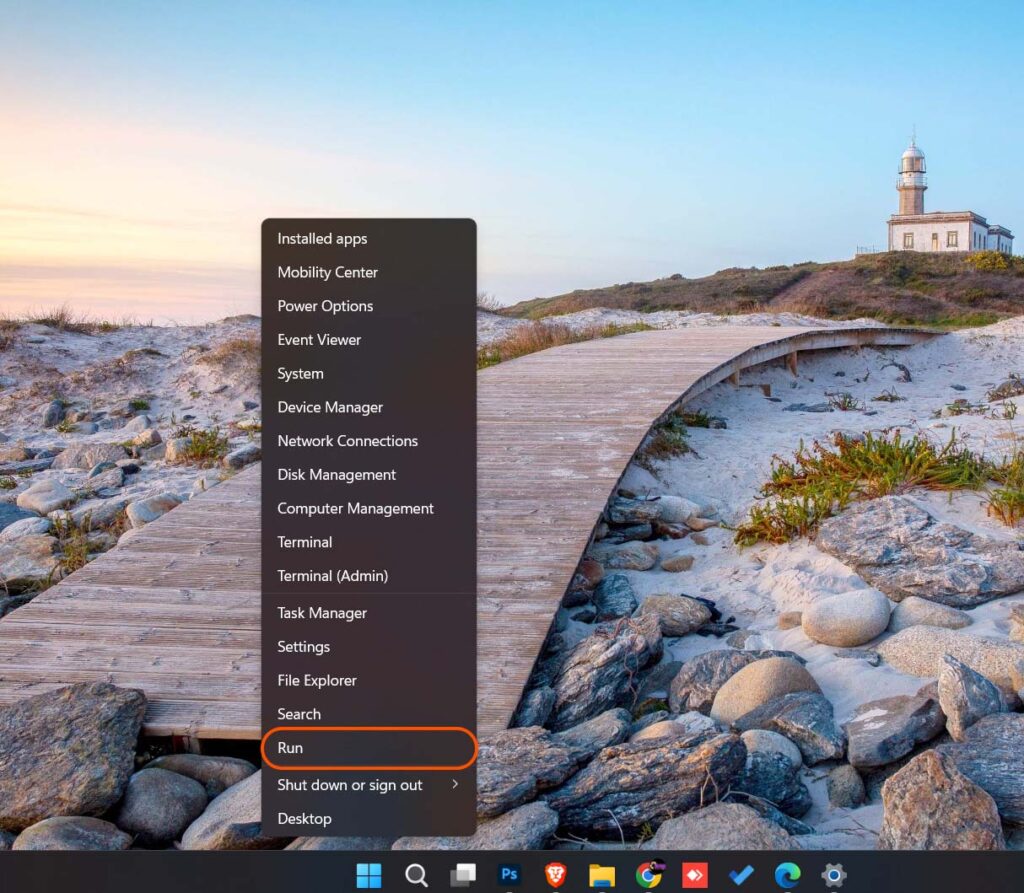
Step 1: To begin, right-click the taskbar’s Start button and select the Run shortcut from the menu that appears.
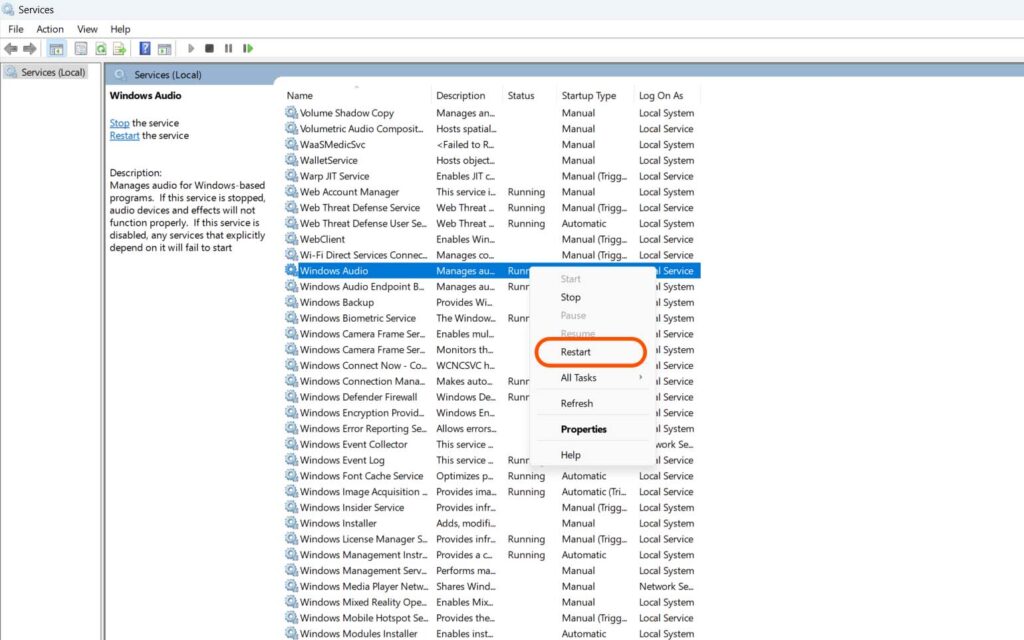
Step 2: To open Services, type services.msc into the Run’s Open box and click OK. Next, select Restart as shown when you right-click the Windows Audio service. Furthermore, you must double-click these audio services to confirm that Automatic Startup Type is selected.
2. Restart Your Computer
Give your machine a restart. If everything above seems normal, there might still be unfinished upgrades. Another possibility is that there’s a brief incompatibility problem that will be fixed following the restart.
To restart or shut down, right-click the Start button and select Shut down or sign out.
3. Update Your PCs Drivers
Update the device drivers on your PC. Even if your peripheral devices—such as speakers or headphones—are functioning properly, a corrupted or missing sound card driver may cause problems with sound quality.
Using a free driver updater application makes installing drivers simple.
Update the PC’s driver manually.
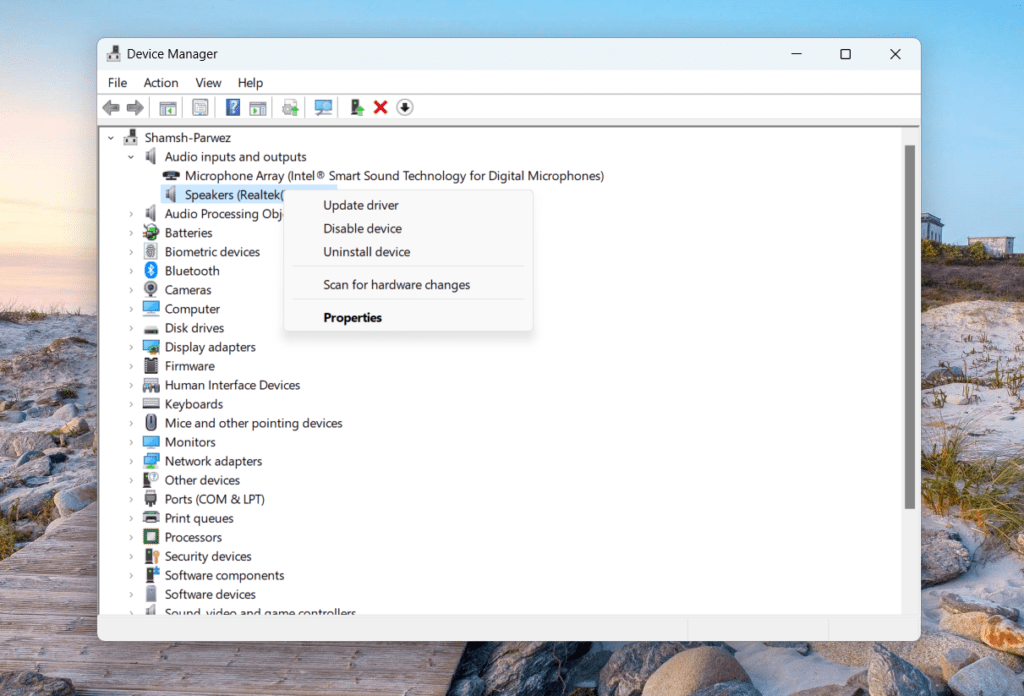
Step 1: On your computer, open Device Manager. Next, double-click Device Manager’s Audio Inputs and Outputs section. Select Update driver by right-clicking the appropriate audio device on your computer, such as Speakers (High-Definition Audio Device), from the drop-down Audio inputs and outputs option.
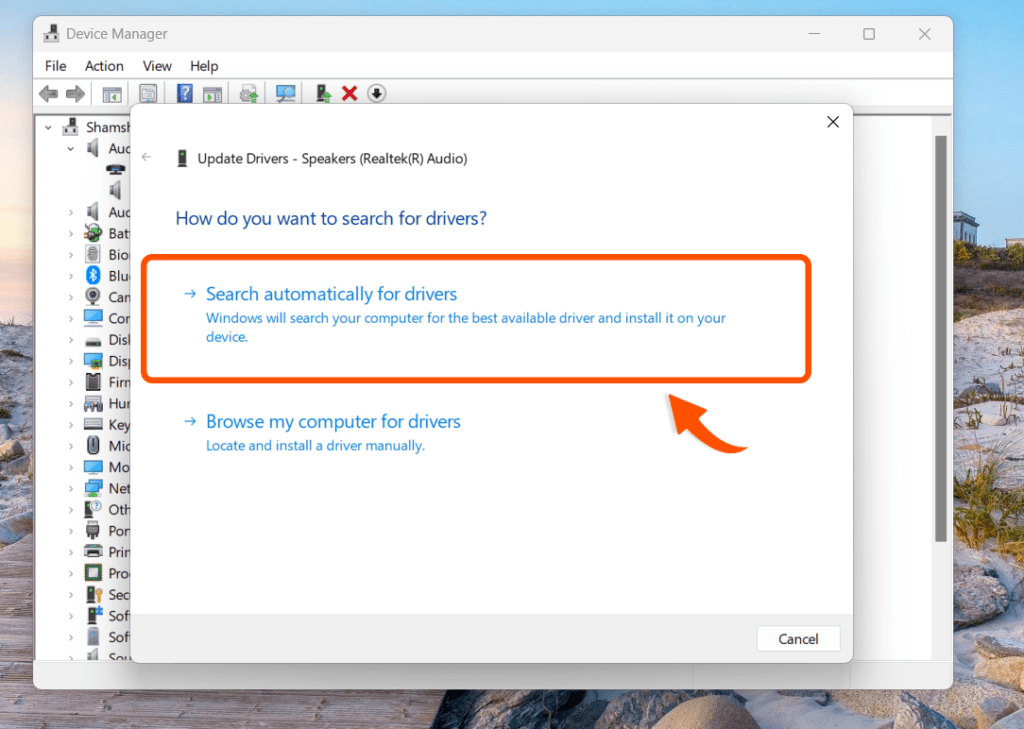
Step 2: Next, select the option to “Search automatically for drivers.”
Update the PC’s driver automatically.
Third-party software is required to automatically update the drivers on your device. You can use third-party software to analyze your computer and determine which of its devices require updated drivers to be loaded.
Nevertheless, you have the option to use third-party software to download and install the most recent audio driver for your device after its audio type has been identified. Third-party software is required to automatically update the drivers on your device. You can use third-party software to analyze your computer and determine which of its devices require updated drivers to be loaded.
Nevertheless, you have the option to use third-party software to download and install the most recent audio driver for your device after its audio type has been identified.
Method 4. Update your PC’s Windows 11
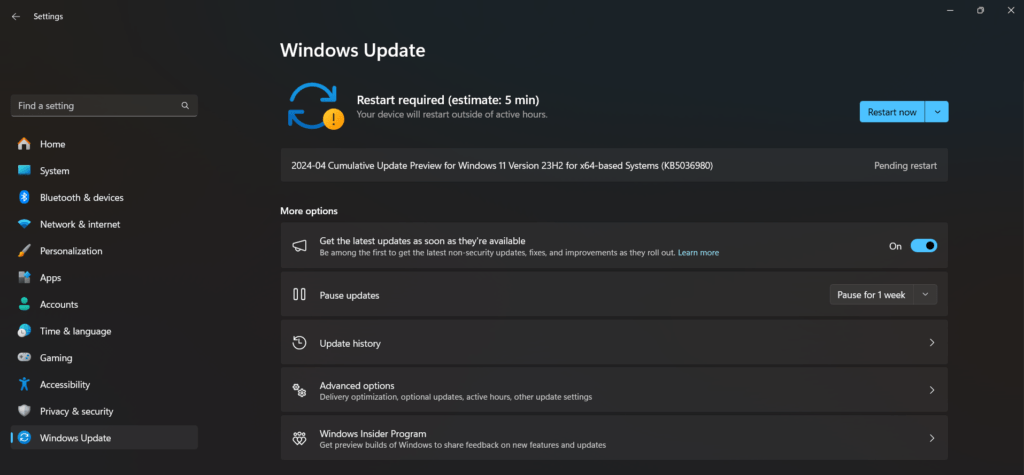
Sometimes the No audio Problem in Windows 11 is from Updating the Windows 11 OS. So kindly update Your PC’s OS.
It is advised that you hold off on updating from Windows 11 until Windows Update notifies you that the update is prepared for your device. To see if your device is prepared for Windows 11,
Select Start > Settings > Update & Security > Windows Update > Check for updates.
Method 5. Change audio options in the sound setting
This is the final way to be covered in detail after the first, second, third, and Fourth have been explained. All set? Now, let’s get going.
Using this method, you can resolve the No Audio issue in Windows 11 by adjusting the audio option in the sound settings. So, how can you modify the sound settings’ audio options? To figure it out, gently follow the step-by-step instructions below!
Step 1: To begin, right-click the Windows 11 desktop area’s speaker icon symbol and select Sound settings.

Step 2: To view the drop-down category, click Select Where to play sound. Click the Unmute speaker button at the Volume bar to make sure the volume is not muted after selecting the default sound output.
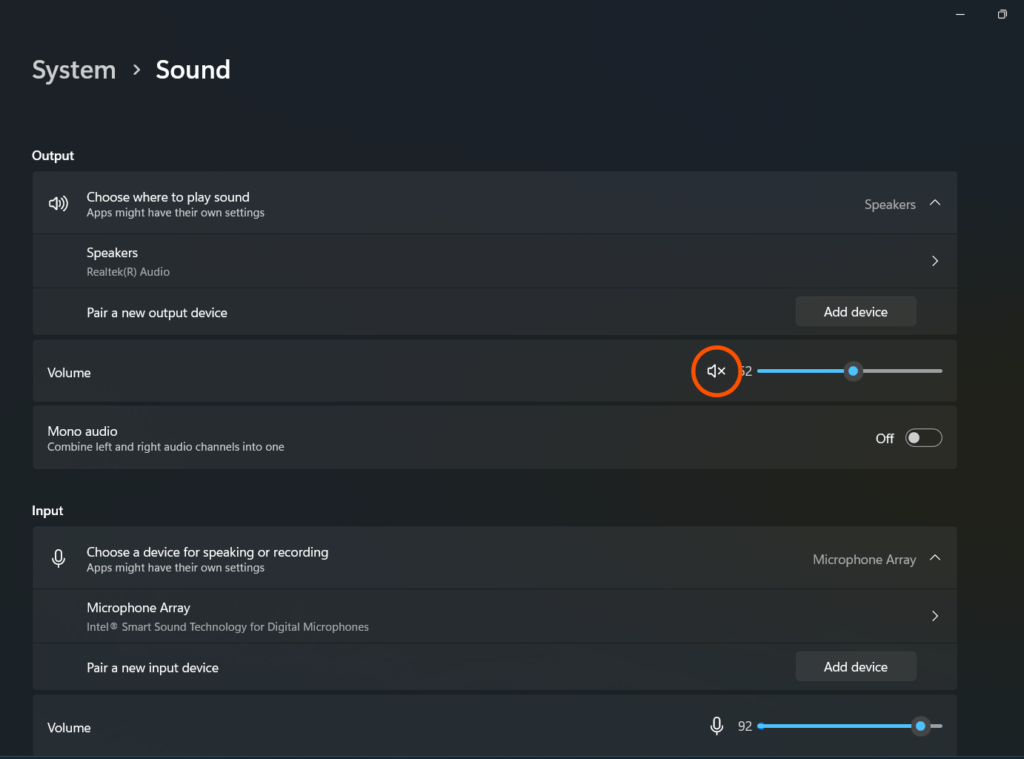
Step 3: If the Volume bar is positioned far to the left, move it to the right. Next, select the Volume mixer option in the advanced settings to navigate to the Volume mixer path. Click the Audio option to enable it.
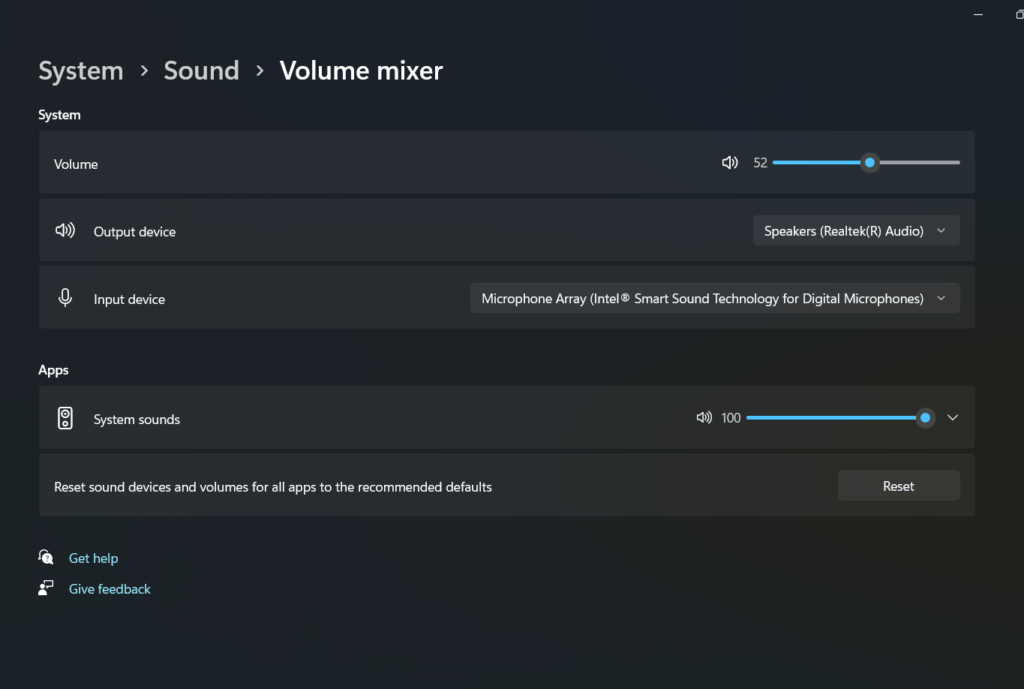
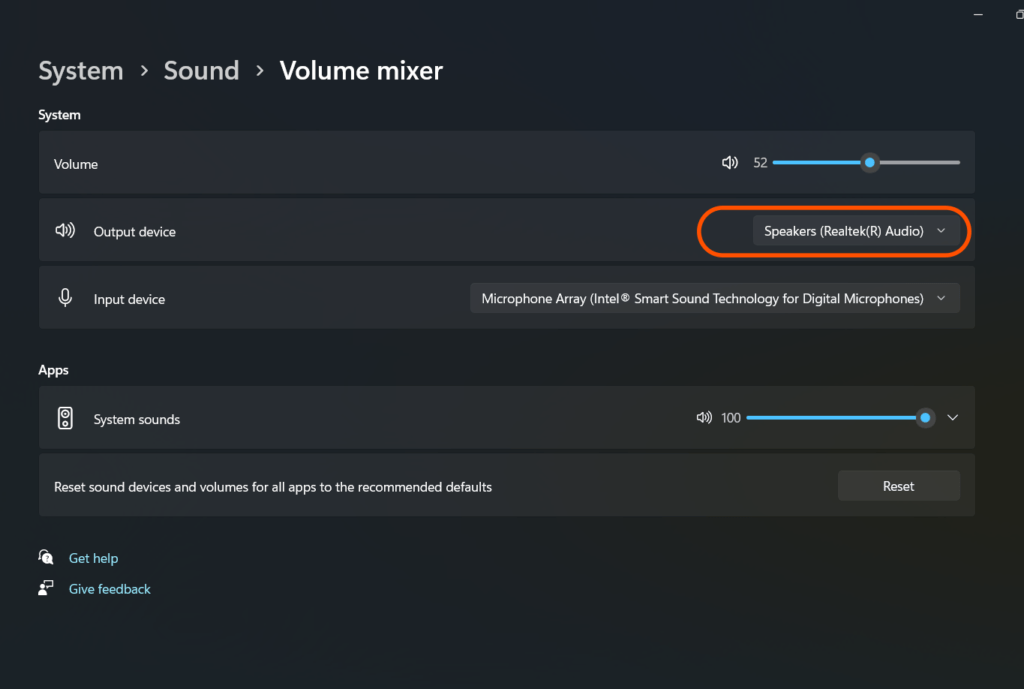
Step 4: Double-check that the Volume and System sound bars are fully oriented to the right at this point. Next, choose System Sounds to see its options in a drop-down menu. Ensure that you select Default from the Output device menu as indicated.
Conclusion
In conclusion, you may resolve any No Audio problem you run into with Windows 11 by using the four techniques covered in this essay. Therefore, if you follow the detailed instructions in this blog post, you won’t experience this problem again. Remember that you can experiment with any of these techniques to see which one suits your needs the best.


They don’t want you to see this. https://groups.google.com/g/tt6y6rr4/c/H_b9pyVHRn4
Check out https://southernprintsusa.etsy.com for digital art, digital art art, digital art digital art, digital wall art, southern art, southern wall art, southern artwork, southern folk art
Thank you for your help and this post. It’s been great.
Thanks for posting. I really enjoyed reading it, especially because it addressed my problem. It helped me a lot and I hope it will help others too.
Thanks for posting. I really enjoyed reading it, especially because it addressed my problem. It helped me a lot and I hope it will help others too.
I’m so in love with this. You did a great job!!
Great content! Super high-quality! Keep it up!
How can I find out more about it?
May I have information on the topic of your article?
Your articles are very helpful to me. May I request more information?
The articles you write help me a lot and I like the topic